Wednesday 27 August 2014

August Manicures


Hey everyone,
                      I hope you all are doing well :) .  As August comes to an end so does my summer vacation, its back to school and the journey of continuous learning. This week I thought I would share a few manicures I wore during the course of the month. These designs do not have a consistent theme throughout, just me experimenting with different polishes. Let’s get on to the manicures enjoy !


Manicure #1


Products used:
L.A Colors (nail stripper): black
Orly: Glowstick                                  
 Sally Hansen: White on


Manicure #2


Products used:
Essie: Mint candy apple                                                    
 L.A Colors (nail stripper): black                                     
Sally Hansen: White on


Manicure #3


Products used:
Essie: Fiji
La Girl (color pop): Birthday cake


Manicure #4


Products used:
L.A Colors (nail stripper): black
Opi: Pinking of you


Manicure #5


Products used:
China Glaze: Luxe and lush
Essie: Wicked 


Thank you for viewing this post and check out my tutorials on this page. Feel free to leave a comment and share this page with your family and friends. Look out for a tutorial next week and enjoy the rest of your day :) .


See you soon.


Ciao,
Shannon.


Thursday 21 August 2014

Ring Nail Art Tutorial (Using a straw)


Hey everyone,
                      I hope you all are doing well :). This week I have a simple nail design which features a regular drinking straw. For this tutorial you will need nail polish and any size straw available to you. I chose to use a smaller size straw which can be found attached to a juice box. Also, be sure to start off with a base coat to protect your natural nails. Let’s get on to the tutorial!


Step one: Start by painting your nails in the desired colour. I decided to paint my ring and middle fingernail white and the rest in teal.


Step two: Dip one end of the straw into some polish and stamp the ring design on to the nail painted in a contrasting colour. You may need to go over some circles to ensure the design is printed fully.


Step three: Repeat step two all over the nails and feel free to have circles overlap. 


Step four: Clean up around your nails to remove any polish from the skin and add your preferred top coat to smooth out design and add shine. (I decided to place the ring design on white nails and place studs on the rest)


Products used:
Essie: Go overboard
Sally Hansen: White on
F21: studs
Top Coat- Seche vite fast drying top coat


Thank you for viewing this post and check out my other tutorials on this page. Feel free to leave a comment and share this page with your family and friends. Look out for another tutorial next week and enjoy the rest of your week.


See you soon.


Ciao,
Shannon. 


Wednesday 13 August 2014

Lace-up Corset Nail Art Tutorial


Hey everyone,
                      I hope everyone is having a great week :). I feel like its been forever since I uploaded a tutorial but its time to turn those frowns upside down because today I have a cute and simple corset design to share. This type of design is frequently seen on the back of elegant wedding gowns and I absolutely adore them. In addition to your nail polishes you will need a thin nail art brush/stripper and a dotting tool (tip of pin or pencil also works). Also, be sure to start off with a base coat to protect your natural nails. Let’s get on to the tutorial!


Step one: Paint nails in a bright pink.


Step two: Separate the nail into thirds using a black stripper.


Step three: Fill in the two outer sections of the nail using black polish.


Step four: Place four pink dots on both black sections as shown in the image.


Step five: Using a white stripper (or thin nail art brush) connect the dots in a criss-cross pattern.


Step six: Clean up around your nails to remove any polish from the skin and add your preferred top coat to smooth out design and add shine.


Products used:
Jordana: Strawberry marmalade 
L.A girl metal: Obsidian
L.A Colours (nail stripper): black
L.A Colours (nail stripper): white
Top Coat- Seche vite fast drying top coat


Thank you for viewing this post and check out my other tutorials on this page. Feel free to leave a comment and share this page with your family and friends. Look out for another tutorial next week and enjoy the rest of your week.


See you soon.


Ciao,
Shannon.  


Friday 1 August 2014

Essie Nail Polish Collection


Hey everyone,
                      I hope everyone is enjoying their summer :). Today I will be sharing my essie nail polish collection. I love essie polishes, they have beautiful colours and the formula is usually quite good. I bought most of these polishes on amazon and from a drugstore in Trinidad (if anyone wants to know the exact drugstore please message me). I will be presenting the polishes and swatches in groups so that it will not be confusing. Lets get on to the collection!


My Essie Collection


 Group one:


(From left to right)
The lace is on: Jewel toned bright pink.
Romper room: Creamy, light pink.
Fiji: Creamy, white-based pink.
Topless and Barefoot: light nude.


Group two:


(From left to right)
Fashion playground: mint green with slight shimmer.
Mint candy apple: blue toned, mint green.
In the cabana: aqua blue.
Go overboard: dark teal. (see true colour in bottle picture, swatch came out darker)


Group three:


(From left to right)
Hide and go chic: medium dusty blue.
Bikini so teeny: light blue with lavender under tone.
Blue rhapsody: metallic light blue.


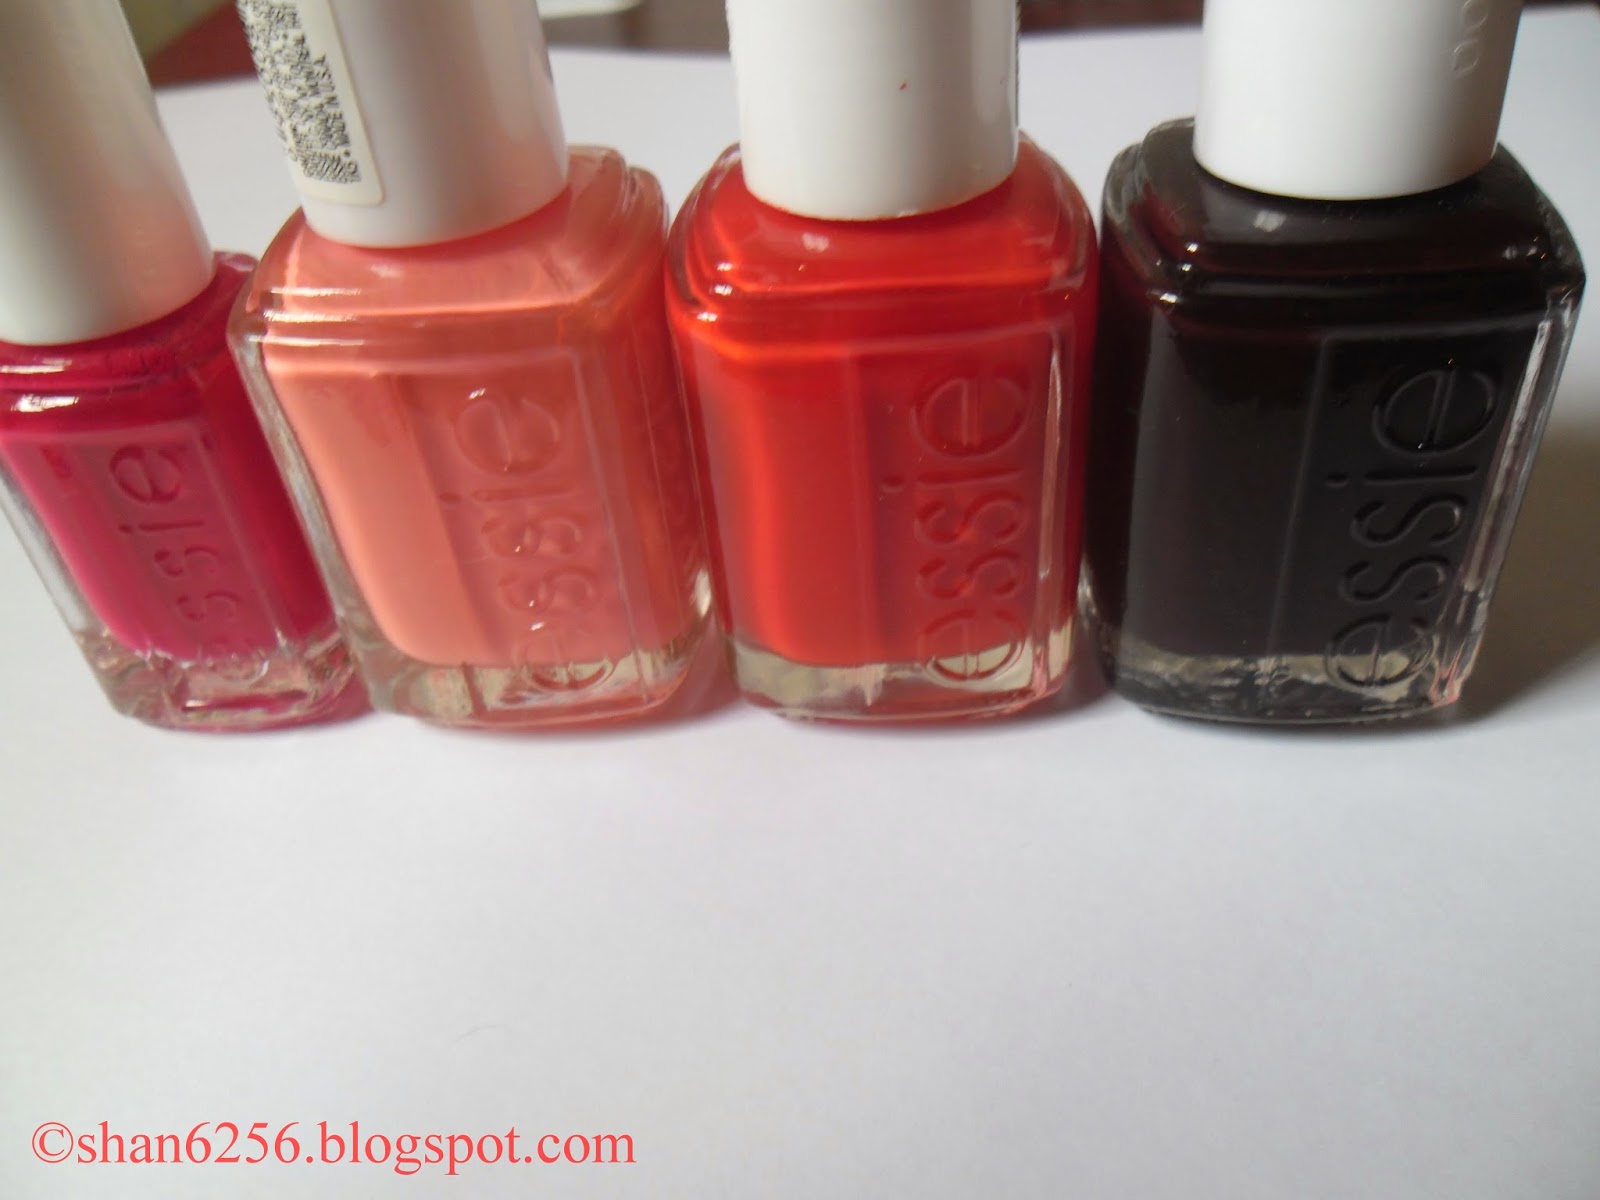
Group four:


(From left to right)
Style hunter: bright cranberry red.
Tart deco: pink based peach.
Meet me at sunset: bright red orange.
Wicked: dark blood red. 


Group five:


(From left to right)
Vested interest: grey toned mossy green.
Cashmere bathrobe: dark grey with heavy silver shimmer.
For the twill of it: metallic grey duo-chrome.
Smokin’ hot: dark grey with purple under tone. 


Thanks for viewing this post :). I enjoyed doing this type of post and I may consider doing this with other polish brands I own. Feel free to leave a comment and share this page with your family and friends. Look out for a tutorial next week!


See you soon.


Ciao,
Shannon.