Monday 28 December 2015

December Manicures (2015)


Hey everyone,
                        I hope you all had a wonderful Christmas :). We have reached the last edition of my monthly manicures for the year of 2015. Its astonishing how fast the year flew by and as we approach 2016; I wish my viewers all the best. This year may have thrown you a few curve balls but do not let yesterday's trials affect your potential to be extraordinary. Also, I want to say thank you to everyone who has taken the time to visit my blog during the year, it is greatly appreciated.  Let’s get on to the many manicures I wore in December enjoy !


Manicure #1


Products used:
China Glaze: It's alive
Essie: Lollipop


Manicure #2


Products used:
China Glaze: For audrey
China Glaze: It's a trapeze


Manicure #3


Products used:
Orly: Rock solid
Silver


Manicure #4


Products used:
China Glaze: Four leaf clover
China Glaze: Refresh mint
Essie: Go overboard


Manicure #5


Products used:
Essie: Smokin' hot


Manicure #6


Products used:
China Glaze: Mosaic madness 
China Glaze: Stroll


Manicure #7


Products used:
China Glaze: In a lily bit
Essie: Go overboard


Manicure #8


Products used:
China Glaze: Four leaf clover
China Glaze: Fairy dust


Manicure #9


Products used:
China Glaze: Luxe and lush
China Glaze: Man hunt


Thank you for viewing this post and check out my other designs on this blog. Feel free to leave a comment and share this page with your family and friends. Also, look out for another post soon. Enjoy the rest of your day and remember to keep smiling :).


See you soon.


Ciao,
Shannon.


Wednesday 16 December 2015

Christmas Lights Nail Art Tutorial


Hey everyone,
                       Welcome back and seasons greetings to all my viewers. Today, I have another Christmas tutorial to share; it is inspired by the lights we string every year around the tree. For this design you will need a couple of different colours as well as a nail art brush. Also, be sure to start off with a base coat before applying polish to protect your natural nails. Let’s get on to the tutorial!


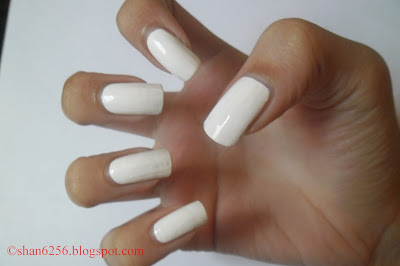
Step one: Paint all nails in a white polish.


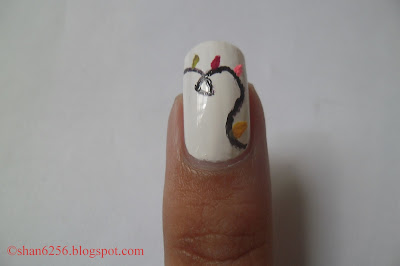
Step two: Across each nail create curved lines and loops (this will represent the natural way in which the cord tangles) using a thin nail brush and black polish.


Step three: Next, along each curved line create very small oval shapes in different colours to act as the actual lights (three to four 'lights' per nail). This can be done in the direction shown in the photo or beneath the line. 


Step four: Clean up around your nails to remove any polish from the skin and add your preferred clear top coat to smooth out design and add shine.


Products used:
China Glaze: Shocking pink
Opi: Lincoln park after dark
Opi: Vodka and Caviar
Rimmel London: Sunny days
Sally Hansen: Green with envy
Sinful colors: Snow me white


Thank you for viewing this post and check out my other posts on this blog. Feel free to leave a comment and share this page with your family and friends. Also, look out for a tutorial next week. Enjoy your week and remember to keep smiling :). Happy Holidays!!


Seen you soon.


Ciao,
Shannon.


Saturday 12 December 2015

Santa's Suit Nail Art Tutorial


Hey everyone,
                        Seasons Greetings to all my viewers :). Today I will be sharing my first Christmas tutorial which, like the title says is a Santa inspired design. In addition to your red, white, black and gold polishes you will also need a thin nail art brush and a dotting tool. Also, be sure to start off with a base coat before applying polish to protect your natural nails. Let’s get on to the tutorial!


Step one: Paint all nails in bright red.


Step two: Next, using a white polish create a thick vertical stripe down the middle of the nail and another strip across the top edge of the nail.


Step three: Using black polish and a nail art brush create a horizontal line midway across the nail to represent a belt.


Step four: Add a gold square detail over the black line previously made for the buckle. Also, gold dots for the buttons of his suit.


Step five:  Clean up around your nails to remove any polish from the skin and add your preferred clear top coat to smooth out design and add shine.


Products used:
Essie: Lollipop
LA Girl: Obsidian
Sinful colors: Snow me white


Thank you for viewing this post and check out my other posts on this blog. Feel free to leave a comment and share this page with your family and friends. Also, look out for a tutorial next week. Enjoy your weekend and remember to keep smiling :).


See you soon.


Ciao,
Shannon.


Saturday 5 December 2015

Hand Painted Flowers Nail Art Tutorial (Using nail polish brush)


Hey everyone,
                       Welcome back :) I do hope all my viewers are doing well and enjoying the magic of the season. Today, I have a floral tutorial to share; it may not really go along with the time of year but I promise the Christmas tutorials will begin from next week. For this design all you will need are your polishes and a doting tool (pencil eraser can be an alternative). Also, be sure to start off with a base coat before applying polish to protect your natural nails. Let’s get on to the tutorial!


Step one: Paint all nails in neutral colour.


Step two: To create the first petal of flower using the colour of your choice, swipe polish brush in upward direction towards the tip of the nail.


Step three: Repeat step two but in different directions until the shape of a flower is formed like shown.


Step four: Finally, add large dot in the middle of the flowers and a few short lines on each petal to make the design more realistic. 


Step five: Clean up around your nails to remove any polish from the skin and add your preferred clear top coat to smooth out design and add shine.


Products used:
Essie: Style hunter
Orly: Gumdrop
Orly: Highlight


Thank you for viewing this tutorial and check out my other posts on this blog. Feel free to leave a comment and share this page with your family and friends. Also, look out for another post next week. Enjoy the rest of your day and remember to keep smiling :).


See you soon.


Ciao,
Shannon.


Friday 27 November 2015

November Manicures (2015)


Hey everyone,
                       I hope you all are enjoying the holiday season. Today I have another addition of my monthly manicures to share. The month of November was a busy one for me therefore, my nail art was on the back burner. However, my schedule has now freed up so look forward to seeing a couple of tutorials in the upcoming weeks. For this month I alternated between solid colours and nail art designs. Let’s get on to this months' manicures enjoy !


Manicure #1


Products used:
Opi: Vodka and Caviar
Opi: Lincoln park after dark


Manicure #2


Products used:
Essie: Bikini so teeny


Manicure #3


Products used:
Essie: hide and go chic
Essie: Style hunter
Essie: Topless and barefoot


Manicure #4


Products used: 
Essie: Cashmere bathrobe
Essie: Vested interest


Manicure #5


Products used:
Essie: Tart deco
Rimmel London: Sunny days


Thank you for viewing this post and check out my other posts on this blog. Feel free to leave a comment and share this page with your family and friends. Also, look out for a tutorial next week. Enjoy your weekend and remember to keep smiling :).


Tuesday 27 October 2015

October Manicures (2015)


Hey everyone,
                        I hope all my viewers had an excellent month and will continue to do so as we approach the holiday season :). The month of October was a hectic one for me and I really felt the brunt of workload. Due to this my nail art was sort of a getaway when I needed to relax also, I got a few new polishes so of course I had to do full mani's using them. For this month like others I alternated between solid colours and nail art designs. Let’s get on to this months' manicures enjoy !


Manicure #1


Products used:
China Glaze: Mingle with kringle
China Glaze: Refresh- mint
Rimmel: Goddess


Manicure #2


Products used:
Opi: Mod about you


Manicure #3


Products used:
Opi: Lincoln park after dark
Sinful Colors: Snow me white


Manicure #4


Products used:
Milani: Mauve medley
Orly: Highlight


Manicure #5


Products used:
Color Club: Macaroon
Opi: Mod about you
Orly: Gumdrop


Manicure #6


Products used:
Color Club: Trippie hippie


Thank you for viewing this post and check out my other posts on this blog. Feel free to leave a comment and share this page with your family and friends. Also, look out for a tutorial soon. Enjoy the rest of your week and remember to keep smiling :).


See you soon.


Ciao,
Shannon.


Wednesday 7 October 2015

Braided Nail Art Tutorial


Hey everyone,
                       Welcome back to my viewers, I do hope all is well in your lives :). Today, I have a braided design to share. And yes its been a while since I uploaded a tutorial, but what can I say other than life gets in the way sometimes. This design maybe a bit tricky at first however, its just about following a continuous pattern. In addition, for this tutorial you will need three different shades and no other tools. Also, be sure to start off with a base coat before applying polish to protect your natural nails. Let’s get on to the tutorial!


Step one: Paint all nails in rose gold shade.


Step two: Using your nail polish brush dipped in pink, make a diagonal stripe from left to right across the nail like shown.


Step three: Next, using a blue shade repeat step two but in the opposite direction across the nail. Ensure colours overlap while allowing all shades to still be visible. 


Step four: Next, create a diagonal stripe from left to right using the rose gold across the nail like shown. Continue a criss- cross pattern using the three alternating colours until reaching the nail edge. 


Step five: Clean up around your nails to remove any polish from the skin and add your preferred clear top coat to smooth out design and add shine.


Products used:
Essie: In the cabana
Essie: Cute as a button
Orly: Rage


Thank you for viewing this tutorial and check out my other posts on this blog. Feel free to leave a comment and share this page with your family and friends. Also, look out for another post soon. Enjoy the rest of your day and remember to keep smiling :).


See you soon.

Ciao,
Shannon.


Monday 28 September 2015

September Manicures (2015)


Hey everyone,
                       Welcome back to my webpage, I hope all my viewers are doing well :). Today I have my September manicures to share. This month I must admit I wasn't as inspired as usual and focused more on doing solid colour manicures. However, this gave me a chance to sift through my collection and wear some of my old favourites. Let’s get on to this months' manicures enjoy !


Manicure #1


Products used:
Forever 21: Black and white glitter
Opi: Vodka and caviar


Manicure #2


Products used:
China Glaze: It's alive


Manicure #3


Products used:
Essie: Mint candy apple


Manicure #4


Products used: 
Essie: Wicked


Manicure #5


Products used:
Opi: Do you have this color in Stockholm?


Manicure #6


Products used:
China Glaze: Mosaic madness
China Glaze: Secret periwinkle


Manicure #7 


Products used:
Essie: Blue rhapsody
Maybelline color show: Silver gleam
Opi: Lincoln park after dark


Thank you for viewing this post and check out my other posts on this blog. Feel free to leave a comment and share this page with your family and friends. Also, look out for a tutorial soon. Enjoy the rest of your day and remember to keep smiling :).


See you soon


Ciao,
Shannon.